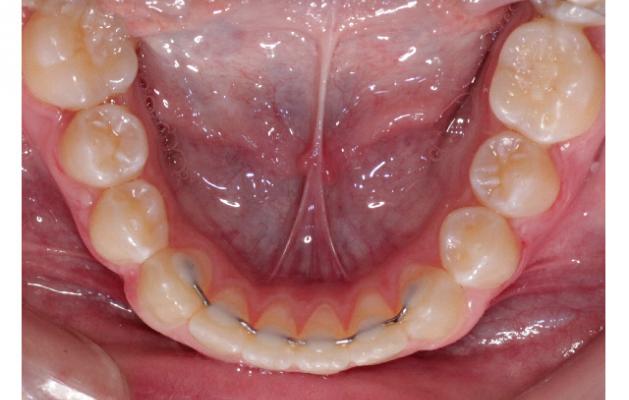
Patients are now demanding retention that is invisible. One solution is the Bonded Lingual Retainer.
QuickBond BLR(Bonded Lingual Retainer)
Patients are now demanding retention that is invisible. One solution is the Bonded Lingual Retainer. The BLR is a fixed bonded lingual retainer designed for ease and accuracy and durability. If you are currently using the direct bonding method to place fixed bonded lingual retainers, our two tray indirect bonding system takes the headaches out of the bonding process and allows for proper placement without the worry of floss or accidental wire activation during placement.
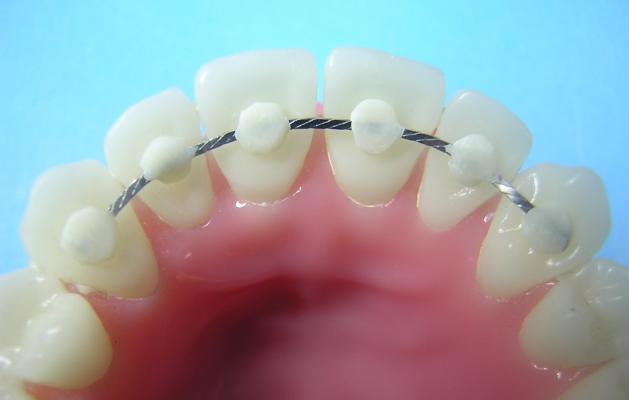
Each Bonded Lingual Retainer is customized to your specifications:
Cuspid to Cuspid
Lateral to Lateral
Central to Central
Wire options:
Flat braided wire: .010 (depth) x .028 (width)
The profile of this wire allows for excellent adaption in difficult cases where other wire may have occlusal interferences.
or
Round Duraloy wire .018
Items you need to send for a mandibular bonded lingual retainer:
Mandibular model
For a maxillary bonded lingual retainer:
Maxillary model
Mandibular model
Wax bite
Note: You may take the impression(s) by removing the arch wire and blocking out the brackets with rope wax. When blocking out please make sure to leave at least 2mm of the facial incisal edge clear of wax.
In office bonding procedures for Indirect Bonded Lingual Retainers
Light Cure Adhesive
Step 1- Optional
Insert the tray on the dental arch to familiarize yourself with the function and fit of the indirect tray. Remove from mouth and clean with acetone. If you opted for a trial fit the pads must be cleaned with acetone to ensure a proper bond.
Step 2- To ensure a good bond between the custom pad and each tooth you will need to etch the lingual of each tooth that will be bonded according to the manufacturers guidelines of the etchant.
Step 3- Rinse each tooth to be bonded thoroughly until each tooth has a chalky appearance.
Step 4- Dry each tooth to be bonded thoroughly. Having a dry field is the most important step in achieving a good bond. Next a thin film of sealant is simultaneously painted on each composite pad and on the lingual surfaces of the teeth.
Step 5- Apply a small amount of light cure adhesive to each custom pad and to the lingual surface of each tooth to be bonded. Applying this small amount of adhesive to both surfaces is done to cover any areas of discrepancy from the impression, model pour-up and/or laboratory fabrication.
Step 6- Seat the indirect trays on the arch to be bonded and apply firm pressure into place.
Step 7- Cure the adhesive of each pad according to the manufacturers guidelines.
Step 8- After curing you may remove trays from mouth. Remove any excess flash with a small burr or scaler. Flowable composite may be used and cured around the edges of the pads to give a smooth and rounded finish.
In office bonding procedures for Indirect Bonded Lingual Retainers
Auto-Cure Adhesive
Step 1- Optional
Insert the tray on the dental arch to familiarize yourself with the function and fit of the indirect tray. Remove from mouth and clean with acetone. If you opted for a trail fit the pads must be cleaned with acetone to ensure a proper bond.
Step 2- To ensure a good bond between the custom pad and each tooth you will need to etch the lingual of each tooth that will be bonded according to the manufactures guidelines of the etchant.
Step 3- Rinse each tooth to be bonded thoroughly until each tooth has a chalky appearance.
Step 4- Dry each tooth to be bonded thoroughly. Having a dry field is the most important step in achieving a good bond. Next a thin film of sealant is simultaneously painted on each composite pad and on the lingual surfaces of the teeth.
Step 5- Accutech recommends Reliance Orthodontics Maximum Cure Sealant as our auto-cure bonding agent. As per manufacturer instructions, mix parts A and B and paint each composite pad and each lingual side of the tooth simultaneously. This step requires an assistant so that the pads and the teeth are painted at the same time to insure proper timing in the curing of the adhesive.
Step 6- Seat the indirect trays on the arch to be bonded and apply firm pressure into place. Continue to apply pressure during the initial 2 min. set and then release and allow the adhesive to set a final set for 3 more minutes. After a total of 5 minutes the trays can be removed.
Step 7- Remove any excess flash with a small burr or scaler.
Other names that this appliance can be called:
Indirect Bonded Lingual Retainer
Fixed Lingual Retainer
Invisible Bonded Retainer

 | Fax: 757.488.7340