We appreciate your timely manner with our appliances. Very helpful staff if and when questions arise.
Appliances delivered on time every time or they're FREE.
1-800-734-7855
Appliances delivered on time every time or they're FREE.
1-800-734-7855
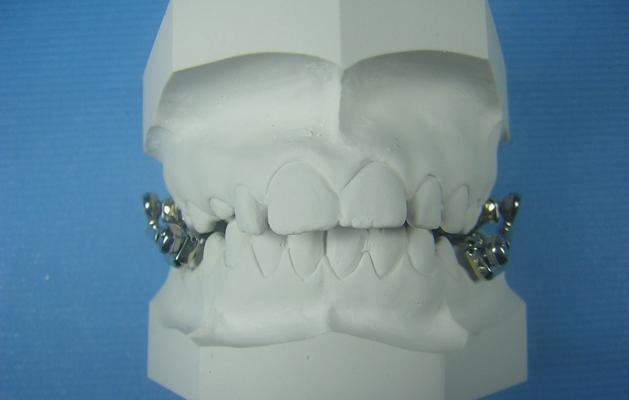
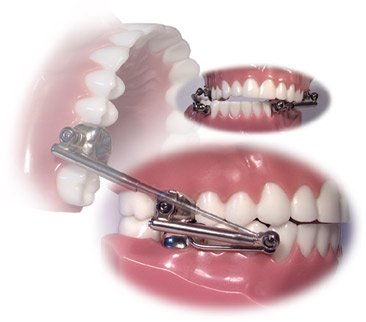
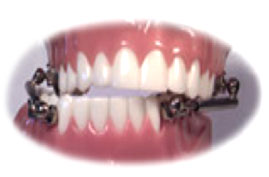
The Herbst Appliance is a functional appliance that was designed to be non-compliant. Though it was invented almost a century ago, until recent years the original design has changed very little. The mandible is held in a protrusive position by means of a tube that is fixed to a pivot located on a band or crown on the maxillary first molars. A rod fits into this tube and is attached to another pivot located on a band or crown on the mandibular first or second bicuspids. The patient can open and close their jaws, but the rod and tube mechanism prevents the mandible from moving back into its normal position. By holding it in this advanced position, the growth of an underdeveloped mandible is enhanced helping to improve facial contours and treat a Class II molar relationship.
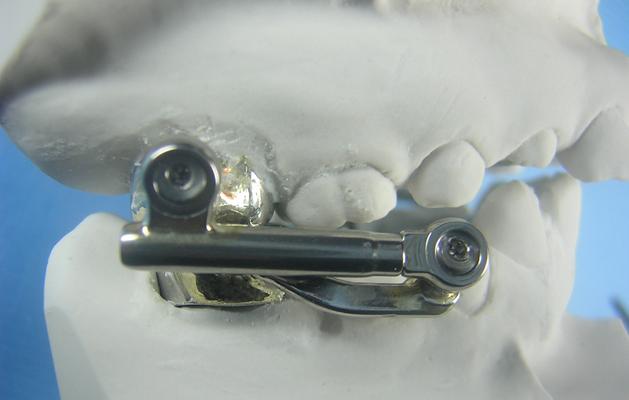
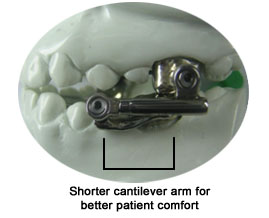
With a recent increase in popularity of the Herbst Appliance among orthodontists, have come design innovations. One major difficulty in prescribing a Herbst was that the patient needed to have fully erupted mandibular bicuspids in order to place bands or crowns for the lower pivots. This limited the ability to place the appliance during the ideal growth period that coincides with mixed dentition. The cantilever design was developed as an alternative to fixing the lower pivots to the mandibular bicuspids. Instead a band or crown is placed on the mandibular first molars and a cantilever arm (metal bar) extends anteriorly to the bicuspid region. The pivot is then fixed to the anterior end of the cantilever arm where the rod portion of the assembly is attached.
Another problem that orthodontists faced had to do with the tube and rod assembly. If the patient opened their mouth wide enough, the rod would sometimes come completely out of the tube. In an attempt to prevent this from happening, labs began making the rods longer. However this caused a different problem. When the patient’s jaws were closed, the end of the rod would extend distally out of the tube and rub against the superior aspect of the mandible due to the advanced position the appliance was designed to maintain. As a result, many patients developed painful ulcers in this area.
One of the biggest flaws with the traditional design had to do with the limited range of motion that patients had when moving the mandible laterally. Each tube and rod had a metal loop at one end which was where the part attached to the pivots on the bands or crowns. The loop fit over the pivot and a screw fit through the loop and into a threaded hole in the pivot. This worked well for opening and closing the mandible, but when moving laterally the appliance tended to bind and often broke as a result of forces exerted upon it.
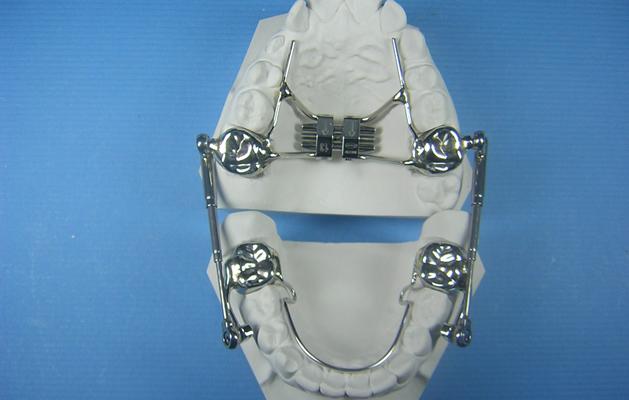
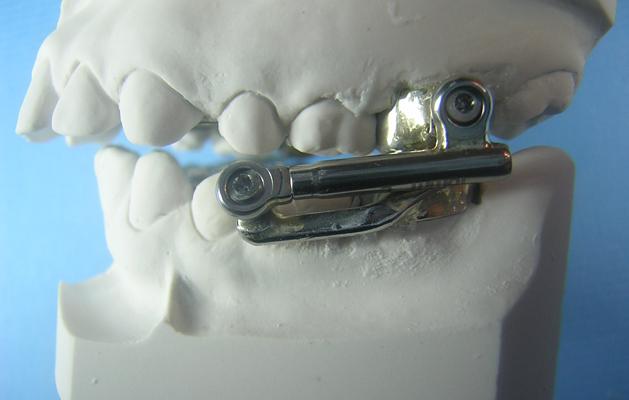
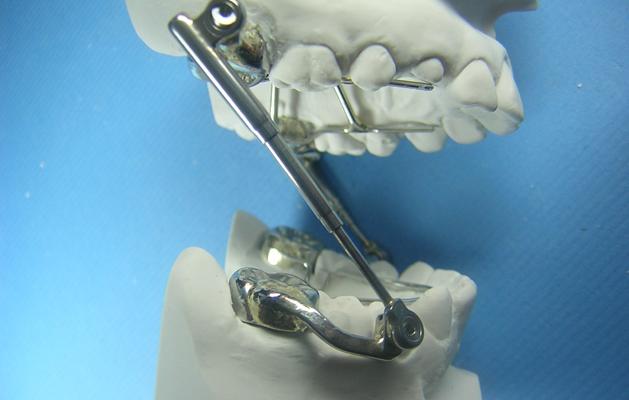
 Dr. Stephen Hanks favored the Herbst appliance in his treatment planning, but wished to improve upon these problem areas. He designed a telescoping Herbst that replaced the two-piece tube and rod assembly with a one-piece telescoping arm which allows patients to open their mouth as wide as possible without causing the appliance to come apart. This design eliminated the problem of painful ulcers caused by the rod rubbing against the superior aspect of the mandible. Dr. Hanks also replaced the traditional style pivots with a ball and socket joint which allows the patients a much greater range of lateral motion. When the cantilever design is being utilized, the Hanks Telescoping Herbst has an accessory which features a one-piece cantilever arm with a built-in threaded end which eliminates the need for welding and soldering these parts in the lab. Dr. Hanks’ innovations have improved the comfort for the patient, reduced the likelihood of breakage of the appliance, made the insertion of the appliance easier for the clinician, and made the Herbst appliance easier for the lab to fabricate.
Accutech’s Herbst Appliances are made using the Hanks telescoping hardware. When combined with a cantilever type design, this advanced system is designed to address some of the most common complaints associated with conventional Herbst designs. The cantilever design allows the orthodontist to place a Herbst appliance on a patient while they are still in their mixed dentition stage rather than waiting for adult dentition to be present. This allows them to take full advantage of the pre-pubertal growth spurt (a time of maximum skeletal growth) which is a key element to the success of this type of treatment.
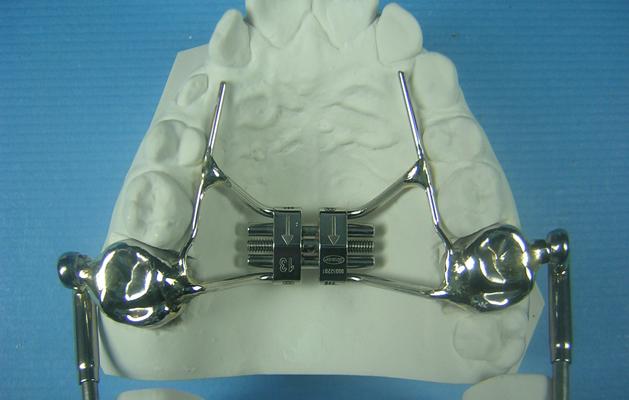
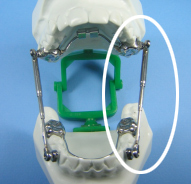 | The Hanks Telescoping hardware replaces the two-piece rod and tube designs of conventional Herbst appliances with a one- piece telescoping arm that can not come apart even when the patient opens their mouth wide. This eliminates the need for training the patient (and their parents) in the refitting of intraoral parts. |  |
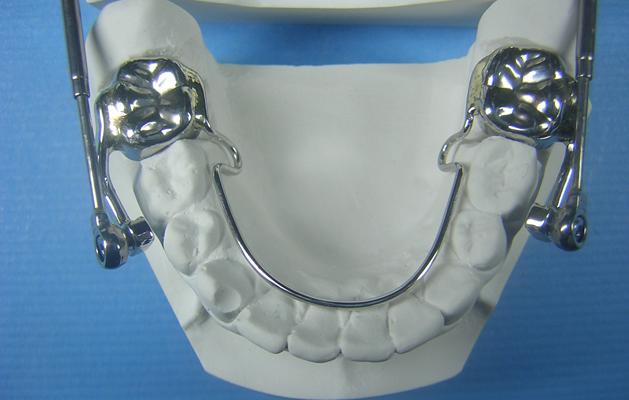
The lack of mobility of the lower jaw associated with Herbst appliances is addressed in the Hanks design by means of an ingenious ball-and-socket design used at the point of attachment. This design allows the patient the freedom to move their lower jaw in a lateral direction without catching or binding and greatly reduces the breakage that such resistance can cause.
 The Hanks Telescoping hardware replaces the two-piece rod and tube designs of conventional Herbst appliances with a one- piece telescoping arm that can not come apart even when the patient opens their mouth wide. This eliminates the need for training the patient (and their parents) in the refitting of intraoral parts.
 Freedom of Movement
FIT AND CEMENT MAXILLARY MOLAR CROWNS
BEFORE CEMENTING
Disconnect telescopes from the crowns.
CEMENT LOWER FIRST BICUSPID CROWNS, OR MOLAR CROWNS FOR CANTILEVERED DESIGNS
Proceed with this step as you normally do.
AFTER CEMENTING CROWNS
It is not necessary to attach the telescopes immediately. Due to the low profile of the nut there will be minimal irritation to the buccal mucosa if the operator wishes to proceed with lateral arch development (expansion) prior to initiating Herbst therapy.
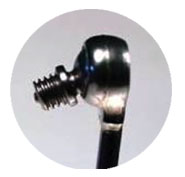
UNDERSTANDING THE UNIQUENESS OF THE TELESCOPING SCREW
The telescoping screw has been designed with what is referred to as an “interference thread”. What this means is that for the last ½ to ¼ turn the opposing threads of nut and screw bind thus locking them together so that a strong force is required to undo the screw. No more Cekabond! Also keep in mind that there are only 3 ½ turns (360º) until the screw is completely seated. Usually, when the screw is turned into place the operator will make a partial turn which ranges from about a ¼ turn to a ½ turn; therefore, it will take at least 7 or more partial turns to completely seat the screw. Furthermore, you will notice that the screw gets progressively harder to turn. This is normal because the interference threads are beginning to engage. Keep turning until the screw stops. It is a good idea to experience this phenomenon outside the mouth where one has good visibility and can actually see the screw seat in the nut. If the screw is hard to turn right from the start, remove and start over again because you may be cross threading and this will ruin the nut.
DELIVERING THE TELESCOPING ROD/TUBE MECHANISMS
1. The telescopes can be pre-measured by simply hand articulating the work models with appliances in place. Articulate so that the incisors are in an edge-to-edge position or the activated position prescribed by the doctor and then measure from the center of the upper nut to the center of the lower nut. That dimension will be such that either a 20mm, 24mm, 27mm, or 31mm length telescope should fit. If the dimension is between those lengths, choose the closest shorter length and then adjust by adding a shim if necessary. Note: the 20mm ultra short lengths may be necessary for extraction cases or very early mixed dentition cases.
2. Telescoping mechanisms may also be fitted directly by the clinician chair-side with the appliances in the patient’s mouth. Follow these steps:
a. Use a panoramic incisor guide to help the patient to posture the mandible forward. This will bring the incisors into the desired edge-to-edge position and keep the mandible from wandering as measurements are made.
b. Use a 4 to 6 inch length of retainer wire (.036”, etc.). Make a 2mm long 90º bend at one end,
c. Insert the 2mm bent end into the upper nut hole against the mesial edge,
d. Now make a mark on the wire where it crosses over the mesial edge of the lower nut hole (doing it this way will give you an accurate center-of-hole to center-of-hole measurement),
e. Now measure on the wire from the bend to the mark and you have the length of telescope for that side.
f. Repeat the preceding steps for the opposite side and select the appropriate length.
g. Install the mechanisms.
PERIODIC ACTIVATION TO ADVANCE THE MANDIBLE
Find and examine the 2mm split-crimpable shims that are used to activate the appliance. Note: Do not remove screws or telescoping mechanisms directly. The split shim is placed onto the rod portion of the telescope. Since the shims are split, the activation procedure should proceed as follows:
REMOVING THE TELESCOPING APPLIANCE
The Herbst Appliance is a trademark of Dentaurum
*Hanks Telescoping Herbst Patents #6,244,862 #6,361,315
INSTRUCTION/WARNINGS
FOR SINGLE USE ONLY
American Orthodontics Corporation and its agents will not be responsible for any and all claims resulting from multiple use of this appliance. Use of this dental device is restricted to duly licensed dental professionals. Do not use this product on patients allergic to nickel and/or chromium metals.
PATIENT INSTRUCTIONS
This appliance is designed to withstand normal forces generated in the mouth but if subjected to abnormal conditions, it may break and become dangerous to you. If the appliance should break or feel or look different than when your doctor installed it, immediately contact the doctor and follow his instructions.

We appreciate your timely manner with our appliances. Very helpful staff if and when questions arise.


©2023 Accutech Orthodontic Lab, Inc.
Site Map | Terms & Conditions
Accutech Orthodontic Lab, Inc.
3345 Bridge Road, Suite 904
Suffolk, VA 23435 | Fax: 757.488.7340